If you have already learned to read the basic Japanese alphabet, Hiragana, then you can move on to learning writing. And if you have not yet mastered this base, we recommend reading our article about hiragana, which explains in detail how it is formed and describes effective ways to memorize it.
The ability to write not only consolidates the knowledge already acquired, but also helps in the further development of a foreign language. This is especially important when learning Japanese, since its letters are very different from the alphabets we are used to.
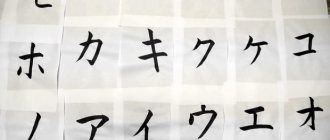
It is worth starting to study Japanese writing with two syllabary alphabet: hiragana and katakana. They both consist of the same sounds, but are spelled completely different. The only thing that unites them in writing is a clear sequence
line in which signs are written. All of them are written with one touch and in a certain direction. Otherwise, the meaning of the letter may be distorted.
According to American linguist Timothy Stout, the types of strokes used to write Japanese characters can be divided into:
- “Stop” (tome). The writer stops the pencil, finishing the line, before lifting the tip from the paper.
- "Leap" (hane). While writing, the pencil comes off the paper, “jumping” to the next line. Because of this, there is a small tail at the end of the line.
- “Smear” (haray). At the very end of the line, the pencil slowly comes off the paper, leaving an angular tail or curl.
The letter "ke" (in Hiragana alphabet) is a good example of all three types. The first line is a “jump”, the second is a “stop”, the third is a “strokes”.
In addition to maintaining the sequence of features, it is important to pay attention to proportions
characters. After all, when writing in Russian or English, no one writes one letter narrower or higher than the other. It’s the same with Japanese characters - you need to try to make them the same. This is true for all languages, because otherwise the letter will not only look ugly, but also be difficult to read.
How to write hiragana
Let's take a closer look at the rules for writing this particular alphabet, because it is key and fundamental for learning.
Hiragana is associated with smooth lines and rounded shapes. Therefore, when studying the letter, pay attention to the fact that there are practically no straight lines in it, they are all slightly inclined or curved.
Japanese language and its alphabet: Series “A”
あ
- written in 3 lines. Note that the second one is slightly curved to the left. You should start writing the bottom part of the sign from the right. It looks like a small pretzel. This element is often found in hiragana.
Some letters are similar to each other, so it is so important to write them correctly so as not to get confused. For example, if written incorrectly, “A” can be confused with “ME”.
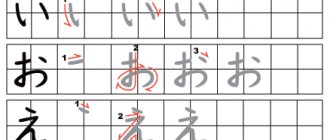
い
- 2 traits. The first is of the “jump” type, which results in a small hook at the end of the line. It looks a little like a putter. The second line is shorter than the first. If you make it longer, you get “RI”. Both lines are slightly curved.
お
- consists of 3 features. The first is written on the left side of the square. The second stroke is a vertical line that turns into a rounded curl that resembles the bottom of the letter “A.” The last line is a short stroke at the top right.
え
- this letter has only 2 strokes. The first is simple and straight at the top, and the second is a line similar to the number 1 with a wavy line at the end. You need to make sure that this wave is not too long and does not go too high.
う
- 2 traits. Small line at the top (same as in “E”). And below there is a curved line, similar to an ear. And do not confuse this letter with “RA”.
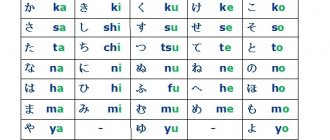
Japanese letters, Hiragana alphabet: Series "KA"
か
- 3 traits. Notice that the first line is a “corner”: a curved line that goes from left to right, going down. The second line is vertical. It is placed on the left side of the square and written with a slight slant. The last line is a small line in the upper right part.
き
- 4 traits.
First, two parallel lines are placed. Then - an inclined straight line. The final touch is slightly curved and is placed at the bottom. Unlike the printed version, in the letter the third and fourth lines do not intersect
.
く
- 1 feature resembling an angle. The main thing is to ensure that the upper and lower halves are the same length.
け
- 3 traits. The first curved line is on the left side of the square. On the right side, a small horizontal line is written, which is crossed by a long line, rounded at the bottom. This part looks a bit like a cross.
こ
- 2 traits. They are placed one above the other and both are slightly curved. Moreover, the first line is shorter than the second.
Nigori signs are placed on the right. These should be two lines of equal length. Don't place them too close to the main syllable.
Japanese alphabet and its symbols: Series "SA"
さ
- 3 traits. In Japanese there are letters that are similar to each other. This sign, for example, resembles “KI”, only instead of two horizontal lines there is one. In the letter, the second and third lines are also not connected.
し
— 1 vertical line, smoothly rounded at the end.
す
- 2 traits. The horizontal line is crossed by one vertical line, which twists into a knot in the middle and ends its path with a slight bend to the left.
せ
- 3 traits. The first one is horizontal, it is slightly directed upwards. The next line is vertical and short. A small tail forms at its end, as it is of the “jump” type. The latter is also vertical, but at the bottom it smoothly bends to the right.
そ
- 1 trait. This letter is written with one touch. Its upper part resembles the English “Z”, and at the bottom a line curved to the left is added to it.
Japanese alphabet: Row "TA"
た
- 4 traits. On the left side of the square, the lines form a cross: a short horizontal line is intersected by a long vertical line. On the right, under the first line, two parallel lines are placed, similar to the small letter こ (KO).
ち
- 2 traits. The first is short and horizontal. The second vertical line begins with a slight slope to the left and ends with a semi-oval bend to the right. Reminds me a bit of the number 5.
つ
- 1 line curved to the right. Its upper part is longer than the lower.
て
- 1 trait. From the end of the long horizontal line, going slightly upward, a line curved to the left extends. It is important to remember that this letter is written with one touch.
と
- 2 traits. A short inclined one touches a small semi-oval.
Japanese alphabet, how to write: Row "ON"
The multiple curlicues make this row the most difficult to memorize in all of the hiragana.
な
- 4 traits.
On the left is written the same “cross” as in the letter た (TA), only shorter. Please note that the third line is a small slant, and the one written below it is the fourth, and not vice versa. This last line at the end is twisted into a “ knot ”.
Remember this element, it is key in this series.に
- 3 traits. A large vertical line is placed on the left side, and two parallel lines similar to こ (KO) are placed on the right side. Make sure there is enough space between them.
ぬ
- 2 traits. The first vertical stroke is written at an angle. The second line is similar to the bottom of the letter あ (A), only with the difference that at the end it twists into a “knot”.
ね
- 2 traits. The first line is a vertical straight line. The next stroke is one whole, it is written in one touch. It starts in the upper left corner. We write a small zigzag, which at the end turns into a rounded fool and again twists into a “knot”.
の
- 1 trait. A curved line goes from the middle to the lower left corner, smoothly rising to the top and forming a semicircle on the right side of the square.
Japanese hiragana syllabary: "HA" series
は
- 3 traits. The first long line is the same as in に (NI). The second is horizontal, it is crossed by a vertical one, twisting into a “loop” at the end. This last stroke is similar to the 4th line in the letter な (NA).
へ
- 1 trait. It starts on the left side in the middle of the cell, goes up and in the middle goes to the lower right corner. The second part is longer than the first, so be careful.
ふ
- 4 traits. A small vertical stroke is placed at the top in the middle. Then a small arc curved to the right is written, and two lines similar to commas are placed on the sides. They look in different directions.
ひ
- 1 trait. In the upper left corner, a short line is drawn upward, which goes down, forming a semicircle, which ends with the same line in the upper right corner. Keep in mind that this semicircle is slightly tilted to the left.
ほ
- 4 traits. This letter is very similar to は (HA), but on the right side at the top there are two strokes rather than one. Be careful when writing the fourth line, because one does not go beyond the second.
As you remember, from this row the rows “BA” are formed, which is written with the nigori sign, and the row “PA”, which bears the hannigori symbol. He, just like his brother, is placed in the upper right corner:
Japanese letters: "MA" series
ま
- 3 traits. First, two identical horizontal lines are placed, which are crossed by a vertical one, curling into a “loop” at the end. This letter is similar to the right element in ほ (ХО), but in this case the last vertical stroke extends beyond the first line.
む
- 3 traits. The first stroke is an ordinary small stroke. The second line at the beginning is very similar to す (SU), but it does not end at the bottom, but goes to the right and up. A small “comma” is written in the upper right corner.
も
- 3 traits. This letter is similar to し (SI), which is crossed by two parallel lines. Care must be taken in the order in which the strokes are written. Unlike き (KI) and ま (MA), the horizontal strokes of this letter are placed after the “hook” is written.
み
- 2 traits. The first line starts in the upper left corner, goes up a little and then goes down, twisting a small “loop”. At the end of the first line there is a small vertical line parallel to the left side.
め
- 2 traits. This letter is very similar to ぬ (NU), but it does not have a “knot” at the end.
Hiragana for children: Row "I"
や
- 3 traits. "I" begins with a small arc in the upper half of the square. A comma-shaped stroke is placed above it in the middle. Then a vertical line is drawn from the upper left corner to the middle.
ゆ
- 2 traits. The first line starts in the left half. A small vertical stroke turns into a semicircle. In the second half of the square it is crossed by a vertical curved line.
よ
- 2 traits. First, a very short line is placed on the right side of the square. Next, the already familiar vertical line with a “loop” at the end is drawn exactly in the middle. Same as in ま, は and ほ.
Hiragana to learn: Row "RA"
ら
- 2 traits. In the middle of the square, a small oblique line is placed on top. Then - a vertical line turning into a semi-oval.
り
- 2 traits. A vertical, slightly curved line is drawn on the left. The second line is longer than the first, it bends slightly to the left at the end. In the printed version, these two features intersect.
る
- 1 trait. It starts with a zigzag, which turns into a semicircle, ending with a “knot” at the end. However, please note that, unlike other similar “loops” (in な, ま, ほ), this one does not have a tail.
れ
- 2 traits. This letter is similar to ね (NE), but here the end of the second line does not form a “loop”, but bends to the right.
ろ
- 1 trait. Everything is quite simple here, because this letter is written in the same way as る (RU), but without the “knot” at the end. The main thing is not to confuse them now! Please note that the line ends in the middle of the cell.
Complete Japanese alphabet: Series "BA"
わ
- 2 traits. Does this letter remind you of anything? It is written in the same way as ね (NE) and れ (RE), but here the end of the second line forms a semi-oval.
を
- 3 traits. The first is horizontal. The next one is vertical. It comes from the middle and is inclined to the left, then an arc is drawn from it to the right. This element is similar to the English letter "h". The last line is a semi-oval curved to the left, similar to an inverted つ (TSU).
ん
- 1 trait. A small “wave” extends from a vertical line slanted to the left. This symbol is also similar to the letter "h" written in italics.
Romaji and Pitch Stress in Japanese - Online Resources
- Phonetics and transcription - glossary of terms
- Online Japanese dictionaries – Project Modelino
- Japanese language – Wikipedia
- Romaji - Wikipedia
- Japanese NAIST Dictionary
- MeCab – a grammar analyzer for the Japanese language
- Furigana - Wikipedia
- Polivanov system - Wikipedia
Japanese script: Hiragana
The easiest way to learn to write is to start using Japanese script.
Hiragana is easy to remember due to its frequent use and ornate letters, which are very different from each other and remain in memory.
The Hiragana alphabet can be learned using simple copybooks to practice all the basic syllables. They clearly show the order of writing strokes
. There are no copybooks with additional syllables (nigori, hannigori and small letters). However, knowing 46 basic combinations, you can write the rest without any problems.
Having mastered the rules of drawing lines, you should move on to pure practice. These recipes will help develop motor memory
. Due to the fact that they need to outline the syllables several times, hiragana will quickly be remembered.
Materials for children will also help in consolidating knowledge. Copybooks with pictures and simple words are a good way to improve writing and learn the names of animals, plants and other objects.
A more advanced type of writing in hiragana. For each symbol there are three rows of cells:
- In the first one you need to trace the letters along the lines.
- In the second row, you should try to repeat the pattern yourself.
- The third row needs to be filled in, despite the sample, and then compare what happened with the original.
Hiragana is the basic alphabet in Japanese. This is where you should start learning not only writing, but also reading and pronunciation.
Updates to this word to transcription translator
Major update to the translator of Japanese characters into transcription
Over the past few weeks, we have been working hard to improve the Japanese word to transcription translator. Here is a list of the most important updates: The quality of the translation of hieroglyphs into transcription has been significantly improved. Now the tonal stress is marked in...
10-12-2017English translation of words in Japanese character translator
Another update in the Japanese text to transcription translator. Now, after you have sent the Japanese text, you can click on a word to see its English translation. We used…
1-11-2017Updates in the translator of Japanese words into transcription
The algorithm for translating Japanese characters into Romaji has been improved: Now the resulting transcription can be copied/pasted into other programs. It took me a while to figure out how to do this. When copying transcriptions of Japanese words, it is very important...
24-02-2017Support for the international phonetic alphabet in the translator of Japanese characters into transcription
I have added an option that allows you to convert Japanese text to International Phonetic Alphabet (IPA) characters in the Kanji to Romaji translator. At first I wanted to use the IPA table from the Japanese Sanseido dictionary, but...
20-07-2015
Japanese script: Katakana
It is believed that, unlike hiragana, this alphabet is more difficult to remember. This may be due to the fact that it is used less frequently. It also contains many similar, almost identical, letters: ソ (so), ン (n), シ (si) and ツ (tsu). Therefore, you need to pay special attention to the direction and order of strokes.
As in the first alphabet, you first need to understand the sequence of traits. For this it is better to use simple copybooks. Practical sheets with tracing lines will help you consolidate your knowledge. Then you can move on to children's copybooks with words.
Once the basics are learned, you need to start practicing more serious writing in katakana.
You will find additional printable katakana copybooks here.
You will have to deal with copybooks often throughout your learning journey. There are three types of writing in the Japanese language - hiragana, katakana, kanji - and each character in them is written in a certain sequence. As soon as the two syllabic alphabets are completed, you can begin to study hieroglyphs.
Download a special notebook for the Japanese language with empty cells
presented below. This way, as you learn new words and grammar, you can immediately practice spelling.
Different kanji for similar words
Kanji is often used to create nuance or give a different flavor to the meaning of a word. For some words, it is important to use the correct kanji in the right situation. For example, the adjective 「あつい」 - “hot” - when describing climate is written as 「暑い」, and when talking about a hot object or person - 「熱い」.
| 暑 | Meaning: hot (climate description only) |
| Kun'yomi: あつ・い |
| 熱 | Meaning: heat; fever |
| Kun'yomi: あつ・い |
In other cases, although kanji are used that are correct for all meanings of the chosen word, the author has the right to choose characters with a narrow meaning according to style. The examples in this book generally use common and simple kanji. For details on using different kanji for the same word, see the Word Study Guide.
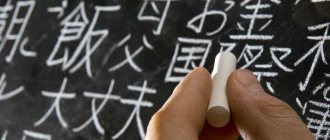
Japanese characters, calligraphy
Unlike alphabets, learning to write kanji is much more difficult. In Japan, there is an entire art form dedicated to the writing of hieroglyphs - calligraphy. So, speaking about the letter, we simply cannot fail to mention her.
Shodo: (書道), or literally “the way of writing,” is a traditional oriental art, like the hieroglyphs themselves, that came to Japan from China. While European alphabets play a predominantly functional role, hieroglyphs have been separate artistic objects since ancient times.
Japanese calligraphy for beginners
If you decide to master this art on your own, then you need to know that this is not an easy process. After all, calligraphy is not just beautiful writing of symbols, but an entire science that includes special rules, history and philosophy.
Like every business that the Japanese undertake, the entire work process is a separate ritual. Technique and every action, starting from choosing brushes and preparing mascara, makes sense and should be honed to the limit.
The “Way of Writing” is close in concept to Buddhism. It is believed to be a path of self-improvement with ink, brush and paper. If a person does not come to harmony within himself, then he will not be able to depict a hieroglyph beautifully. That is why the true beauty of a calligraphic symbol is in the harmony and peace of mind achieved by the master.
To begin with, it is important to know what tools calligraphy masters use:
- brush (筆 - fude);
- inkwell for dissolving solid ink (硯 - suzuri);
- black or red mascara (墨 - sumi);
- special Japanese paper (和紙 - washi);
- holders (文鎮 - bunshin) and substrates (下敷き - shitajiki) for paper.
For beginners, you can buy everything you need at an art store: simple gouache, a soft pointed brush, paper and a jar of water. And only then will it be necessary to expand your arsenal with more professional tools.
Probably, each of the students was faced with the need to look up kanji in a dictionary without knowing how to read it. In this case, you can draw a Japanese character and translate it online using a translator. But even for this you need to know in what order kanji are written. Otherwise, the character may not be recognized correctly.
And studying calligraphy without this knowledge is not at all possible. Watch a video on how to learn to write Japanese characters.
Each hieroglyph has its own clear structure. Remember the 3 types of lines mentioned above: stop, jump and stroke. It is important to keep them in mind when writing kanji.
The master holds the brush only with the thumb, index and middle fingers at the middle or higher, tilting it 45 degrees. It is important to learn how to smoothly lead each line, pressing and releasing pressure at the right moments.
How to draw Japanese characters
After preparing the basic tools, you will need to select a hieroglyph. It’s worth starting with the simplest ones, for example, with “person” (人).
Divide the sheet into 4 squares to understand which part each line should be in. Next, holding the brush at an angle of 45 degrees, make the first stroke and draw the line obliquely to the left. Draw the second line to the right, stop and, with pressure, move it a little more to the right. The kanji for “man” is ready!
Also, during training, it is recommended to watch as many videos about calligraphy as possible so that you can copy the Japanese characters you see and practice more. And remember: in any business, the main thing is practice!
Which type of writing do you like best - hiragana, katakana or kanji - and why? Write in the comments!
Japanese calligraphy. Notebook for hieroglyphs, hiragana, katakana. An article about how to draw Japanese characters for beginners. Copybooks of Japanese alphabets.
Okurigana and changing readings
You may have noticed that some words end in hiragana, such as 「高い」 or 「大きい」. Since these are adjectives, the accompanying hiragana, called okurigana, is needed for various transformations without affecting the kanji. Remember exactly where kanji ends and hiragana begins. There is no need to write 「大きい」 as 「大い」.
You may also notice that the kanji readings individually do not match the readings in some words. For example, 「学校」 is read as 「がっこう」, not 「がくこう」. Readings are often transformed in this way to make pronunciation easier.
Ideally, check your reading of each word that is new to you. Luckily, with the help of online and electronic dictionaries, finding new kanji is easy. Kanji Search Guide