History: how and when the sword appeared
Japanese edged weapons were formed from the Nara era (710-794) until the end of the 12th century. Wakizashi, katana, are blades that appeared under the influence of Chinese culture and borrowings from Korea. Already during the Nara and Heian periods, the appearance of edged weapons was fully formed. The design features of the objects determined the methods of their possession and influenced horse and infantry battles.
The edged weapons of the Land of the Rising Sun personify the samurai philosophy, worldview and way of life. Like the military class itself, its indispensable attribute was constantly evolving. Previously, it was considered magical and symbolizing power. The Guardian of Honor was the second, spare sword, mandatory in the equipment of every samurai. It replaced the tanto and was used in cases where the katana was not applicable. It was required for ritual suicide if the warrior lost the kusungobu dagger intended for this.
The peculiarity of short Japanese weapons is their accessibility to all classes. The guardian of honor was worn by merchants and artisans. These weapons were allowed to be carried indoors. The samurai handed over katanas at the entrance, but always kept short swords with them. An exception was made for long stays. Over the centuries, the culture of wearing blades has changed; sheaths with a pass-through cover and clips have appeared. During the era of World War II, the wakizashi was equipped with a removable cover that was worn on the belt. In the Marine Corps, blades in sheaths with two clips and a leather loop were especially in demand. Guardians of honor without kurikata ears, improved by the sarute loop, have spread.
Guardian of Honor
general information
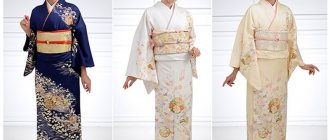
Wakizashi is a relatively small item. The length is 30-61 cm, including the handle - up to 80 cm. It was used independently only by merchants and artisans, and for warriors it was paired with a classic katana. Due to its small size, the guardian of honor, which replaced the tanto, was used in situations where there was not enough space for the katana blade.
The wakizashi blade is sharpened on one side. The curvature of the blade is small; the shape resembles a samurai's katana. The zukuri wakizashi is thinner, and the convex section is less than that of a katana. The short blade cut soft objects sharply.
Now there are fencing schools that teach how to use a pair of daise correctly. There are fewer of them than those that explain how the katana is used, but the popularity of the two-handed fighting technique is stable.
Nice short weapon
Purpose of the sword
The characters for "wakizashi" can be read in several ways; one of the options is “stuck assembly”. This reflects the carrying of the blade: behind the belt on the left, closer to oneself than the katana.
Wakizashi was intended for artisans, merchants, and the military class. He was found everywhere. Sometimes it was worn almost on the stomach, following fashion trends, and in other periods - parallel to the main blade. In photographs of antique wakizashi kept in museums, you can see their laces. With the help of sageo, the weapon was fixed by threading the cord into the kurigata - a bracket on the scabbard. Even with active movements of the torso, the blades were securely fixed and did not fall.
Unlike the katana and tachi, the wakizashi is a simple, everyday item. Its handle was not decorated with expensive engraving or valuable leather. The classic design option is braiding with a simple braid. Often a single craftsman would make a pair of daishos. Such kits were considered the best.
Fencing samurai
DIY wakizashi sword. Master class with step-by-step photos
How to make a short Japanese sword with scabbard.
Step-by-step instructions with photos Author: Oleg Vladimirovich Mamaev, teacher of history and social studies MCOU "Batkovskaya Basic School", Ryazan region, Sasovsky district, Batki village
Purpose: The master class is intended for students of early and middle adolescence, teachers, as well as for all those who like to do handicrafts and create original and interesting paper crafts. Description: The craft is a model of a Japanese wakizashi sword. This is the second version of making a sword, differing from the first in individual design elements. In addition, a comfortable sheath has been created for the new weapon. First option: /blogs/oleg-vladimirovich-mamaev/mech-samuraja-svoimi-rukami-master-klas-s-poshagovym-foto.html Purpose: Making a wakizashi sword. Task: To make a sword of high quality, beautiful, close to the original. Materials: Self-adhesive film in black, gold and metallized colors, side dimensions: black and metallized film 50 by 50 centimeters, gold film - a strip with dimensions of 4 by 15 centimeters. A piece of cardboard measuring 10 by 10 centimeters, a small mirror (a mirror is needed to create a circle, you can use a compass instead)…
...two thick sheets of A3 paper, wide and narrow tape, black electrical tape, scissors, instant glue, pen, penknife with saw, 50 centimeter ruler...
...one thick issue of the Pyaterochka advertising catalogue.
Progress of the master class
1. We start making a sword by creating a blade. On a thick sheet of A3 paper, mark seven (as far as there is enough space) vertical lines located at a distance of 4 centimeters from each other.
2. Fold the sheet along vertical lines inward, turning it into a multi-layer paper strip. At the top of the workpiece we draw an oblique line, as shown in the photo. Cut off excess material.
3. Glue the side open side of the workpiece with narrow tape.
4. Glue the upper open corner of the workpiece with narrow tape.
5. From the metallized film we cut 2-4 strips corresponding to the length of the workpiece and each 5 centimeters wide.
6. Having removed the paper layer from one strip, glue the film onto the workpiece. At the same time, we glue it as shown in the photo: we glue the right part of the self-adhesive (R) onto the outer edge of the workpiece, and we glue the left part (L) - turning the workpiece over to the other side - on the opposite edge.
7. Result. One half of the workpiece is pasted over.
8. In the same way we paste over the second half of the workpiece.
9. Result. The workpiece is pasted over on both sides. All that remains is to cover the top paper corner with film. To do this, we use a small strip of self-adhesive tape.
10. The outer coating of the blade is ready.
11. To prevent the blade from bending and breaking, we will strengthen it with a rod - a fifty-centimeter wooden ruler.
12. We apply the blade to the ruler, and mark on it those parts that will be removed in the future. In the photo they are highlighted in dark color.
13. Using a knife, cut off excess material. When cutting out the shank (handle), you should remember that it should not be too thin.
14. Result.
15. We insert the ruler into the blade and proceed to creating a habaki - a special attachment for the blade. For this we need a strip of gold film.
16. Wrap the lower part of the blade with self-adhesive tape.
17. Done. We move on to creating a tsuba - a round plate that separates the blade from the handle.
18. To create a tsuba we will need a piece of cardboard and a small round mirror.
19. The cardboard was taken from a mobile phone box. We turn the cardboard over to the other side, apply a mirror and trace it around the circumference.
20. Cut out the blank. We cut small strips of black self-adhesive tape with which we paste the workpiece as shown in the photo.
21. Tsuba is ready.
22. Pierce it in the center with a knife.
23. We put the tsuba on the shank and move it towards the blade.
24. Use second glue to fix the position of the tsuba.
25. To create a comfortable handle, take the Pyaterochka release and use wide tape to attach its edge to the shank.
26. Wrap the paper tightly around the shank.
27. Having finished winding, glue the open edge of the paper with tape so that the workpiece does not unwind.
28. We give the handle an elegant appearance by covering it with black self-adhesive (it will be more beautiful if, as in our case, we take a design with a pattern). We wrap the places marked in the photo with the numbers “1” and “2” with electrical tape.
29. The weapon is ready! 30. Let's move on to creating a sheath for the sword. Take a second thick sheet of A3 paper and mark seven vertical lines on it, located at a distance of 5 centimeters from each other.
31. Fold the sheet along vertical lines inward, turning it into a multi-layer paper strip. Glue the side open side of the workpiece with narrow tape.
32. At the top of the workpiece we mark two oblique lines of one centimeter each. Cut off excess material.
33. Glue together the open parts of the workpiece with narrow tape.
34. Cover the workpiece with black film in the same way as we previously covered the blade with self-adhesive tape. The result is in front of you: the sheath is made in the same color as the handle of the sword.
35. The sword is easily sheathed.
36. The sheath corresponds to the size of the sword.
37. The sword is also easily removed from its sheath.
38. Split view.
Thank you for attention!
We recommend watching:
What you can make from paper with children Do-it-yourself decorative paper knife. Master class with step-by-step photos DIY paper ax. Master class with step-by-step photos DIY Viking Axe. Master class with step-by-step photos
Similar articles:
DIY paper horse
Interesting three-dimensional crafts made from colored paper and cardboard
DIY paper flowers gifts
Three-dimensional paper applique for children. Dandelion
DIY paper houses
How to wear it correctly
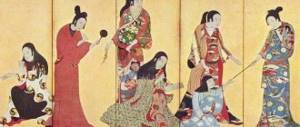
The small sword is the owner's constant companion. No amount of etiquette could force a person to be separated from his faithful blade. Although in ancient Japanese houses there were special compartments for storing guest blades, wakizashi were placed there only in one case - if a person arrived for a long time and wanted to put the item away for storage of his own free will. Even if a guest entered the shogun's palace, they had no right to take away the short sword. This is reflected in the paintings that have come down to us - portraits of influential, noble gentlemen of previous eras. It can be seen that the aristocracy in luxurious attire always carried a short sword.
Wakizashi are worn at the waist. Designed to be close to the body. This excludes the wearing and use of a blade by a warrior in full combat gear: a pair of tanto, tati, was attached to the armor. Wakizashi was accompanied by casual clothing and light protective equipment. It was worn along with ceremonial clothing.
The samurai chose the guardian of honor as an auxiliary weapon. The blade located next to the body allowed one to protect oneself in unforeseen situations in places where no one expected an attack. At other times, a warrior with a katana defended himself with this blade. For ordinary people, wearing wakizashi had a different meaning. For ordinary people, this weapon was the only one allowed, so it was not perceived as auxiliary, but as a full-fledged one.
Armed samurai
Katana - strengths and weaknesses of this sword
There are many myths regarding the quality of samurai swords:
- The katana is made of steel that is forged tens of thousands of times, acquiring the qualities of real Damascus steel. In fact, the steel that was mined in Japan has never had outstanding characteristics. To give it the necessary hardness it had to be forged several thousand times. As a result of this, multilayer blades were obtained that had nothing in common with Damascus steels;
- A katana can easily cut through any material, be it flesh or iron. In fact, Japanese armor was never particularly strong, so cutting it was not difficult;
- The blade of a katana could easily cut through a European sword. This situation in itself is absurd. The European sword was intended to pierce heavy iron armor, and the katana was intended for precise strikes. While European knights could block blows with swords, samurai dodged blows, since one single blow to the sword could chip the cutting edge of the sword. The sword fighting technique of the samurai was radically different from the fighting of knights.
Most likely, the myth about the quality of Japanese swords stems from the fact that the katana easily cut through the light swords of Europeans, who no longer had heavy swords in this era.
You can often hear the opinion that a katana can both chop and deliver effective piercing blows. In fact, stabbing with a katana is quite inconvenient. Its shape emphasizes that its main purpose is cutting. Of course, there are samurai swords that can cut iron, but these are isolated examples. If we compare them with the total number of European swords capable of the same feat, the comparison will not be in favor of the katana.
The weaknesses of the samurai sword blade were as follows:
- Since the katana is not intended for fencing, its main weakness is fragility;
- Possessing great hardness, the katana blade can easily break from a blow to the plane of the blade, so in battle the samurai carefully took care of their weapons, which could cost the annual income of a large village;
- By the way, the katana blade could be broken by hitting its flat side with nunchucks.