Are you already familiar with onigiri - Japanese rice balls? We promise: onigiri will definitely become the highlight of your menu - both during lunch with colleagues, as a healthy snack for your children during recess, or as a convenient provision for your next trip. We will tell you how rice balls are prepared in the homeland of this dish - in Japan.
See also Rice porridge with milk
Rice kutia
How to prepare onigiri
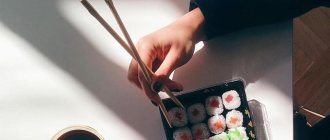
The word "onigiri" comes from the verb "nigiru" and in Japanese means to squeeze, which reflects the way the dish is prepared. Onigiri is made from boiled warm glutinous rice. Squeeze the rice in your palm to form balls, triangles or squares.
The products are stuffed with vegetables or meat, and in Japan, in addition, they like to decorate them with cute faces made from sheets of nori. We'll show you where to start if you decide to try Japanese rice balls.
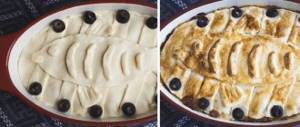
How to make onigiri: Mix rice with fish and herbs, then form into rice balls
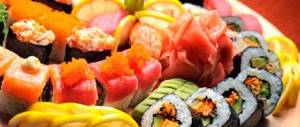
Asian fast food made from rice not only looks funny at times, but is also mainly a useful and practical filling product for satisfying hunger in between. For those who don't like raw fish and rice vinegar seasoning in their sushi, plain rice onigiri is a great, tasty alternative. In Japan, you can buy onigiri in a variety of flavors everywhere, and they are always found in lunch boxes, or bento, containers of food that you take on the go.
Step-by-Step Way to Make Onigiri Like a Pro
Collect and measure
Gather and accurately measure all ingredients. This first step before preparing any treat cannot be skipped. Especially if you want to cook without any hassle or mess.
Steaming onigiri rice.
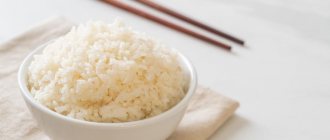
To make delicious onigiri rice balls, prepare fresh Japanese short grain rice. This is because fresh parboiled rice makes beautiful rice cakes in any shape. Additionally, freshly cooked rice tastes better than pre-cooked dry rice.
A. Washing rice
Before cooking rice, wash it thoroughly. Place the rice in a large bowl and rinse under running water. While rinsing, move your fingers in a circle to remove any dust or stones stuck between the grains. Rinse the rice about 3-4 times.
b. Soaking
Fill a large bowl with water and add all the rinsed rice. Let them sit for about an hour so they soften and cook quickly. In addition, soaking removes excess starch, making the rice tastier. After soaking, thoroughly drain the rice from the starchy water. To do this, place the rice in a sieve over a large bowl to catch the starchy water. Let drain for at least 15 minutes.
c. Boil
Take a large saucepan. You can choose a rice cooker or any pan with a heavy bottom. Such dishes will help dissipate heat evenly. Moreover, the lid of the frying pan must fit tightly into the circumference of the frying pan to prevent steam from escaping. Now add rice and water according to the above proportions and let the water boil over medium heat with the lid closed. As soon as you see the water boil, reduce the heat and cook the rice for about 12 minutes or until the water disappears.
d. Let it brew
Once the onigiri rice is cooked, turn off the heat and remove the pan from the stove. Leave the lid on and let the rice steam for another 10 minutes. In short, if you want to cook perfect onigiri rice like a chef, follow the above tips and time sequence.
e. Cool
Place the rice in a large bowl, wooden hangiri or plate lined with butter paper to prevent the rice from sticking. Use a rice paddle and turn the rice over to cool and fluff up. In short, refrigerating freshly cooked onigiri rice is essential to prevent hand burns.
Prepare the onigiri fillings.
To save your time and improve your work efficiency, you can start preparing the onigiri fillings while the rice is soaking. Try different delicious onigiri fillings to enhance the flavor and aroma.
A. Salted salmon onigiri filling
Take a freshly cut and washed salmon fillet. Sprinkle both sides of the fillets with your favorite salt to taste. Then bake or roast them at about 200 degrees Celsius for 20 minutes or until done. The end result is that the salmon should be flaky and crispy on the outside and juicy on the inside. Cut the salmon fillet into small pieces, and the lightly salted salmon onigiri filling is ready.
b. Umeboshi onigiri filling
Simply remove the seeds from Japanese pickled plums and leave only the pulp. You can use bamboo skewers to make removing the seeds easier. The fresh umeboshi onigiri filling is ready.
c. Okaka onigiri filling
Take a small bowl and add the measured amount of Katsuobushi. Then add soy sauce to it and mix well. Make sure you add enough soy sauce to moisten the dried mackerel pieces without over-soaking them. The okaka onigiri filling is ready.
d. Onigiri filling with tuna and mayonnaise
Drain the canned juices and place the tuna pieces in a small bowl. Add Japanese mayonnaise and soy sauce according to the measurements above. Mix well, the filling of onigiri with tuna and mayonnaise is ready in seconds.
How to cook rice balls?
Cut the sheet of nori seaweed to the size you want to wrap the rice balls. Now follow one of the following two methods to make rice balls.
A. Traditional method
First, wet your hands with water to prevent the rice from sticking and breaking. Then rub some salt evenly into your palms. Don't use excess salt or your rice will become too salty. Here, the purpose of using salt is to preserve the onigiri rice for a long time. It is best to use sea/kosher salt as it is less salty than table salt.
Then take about a cup of rice in your hand. Press down the middle of the rice and make an indentation. Add 1-2 tablespoons of desired and already prepared onigiri filling. Then roll out the rice with your palms on the side and hide the filling. Press lightly with your fingers to shape the slightly sticky rice into the desired shape.
Be careful not to press too hard, otherwise you will squeeze out the filling and crush the rice grains. Finally, wrap the beautifully shaped Japanese rice balls in nori sheets. You can also put some filling on top to identify the different fillings and seasonings of the onigiri.
b. Modern non-contact method
The modern no-touch method does not involve using your hands to make the rice balls. This alternative method of making onigiri uses a rice bowl, plastic wrap, and a rice paddle. To do this, first place a sheet of cling film on the bottom of a small rice bowl. Spread the rice evenly and add your favorite onigiri filling to the center. Then fold the sheet in from the sides and twist the top to create the perfect shape. You can easily make perfect spheres or triangles using this method.
Serve and rehydrate
Slice the onigiri until it is warm and moist. Avoid drying or hardening the rice before serving. To do this, cover the rice balls. See our FAQ section to learn more about storing cooked onigiri.
Rice for onigiri
To ensure that onigiri retains its shape, it is best to use sushi rice or other round grain rice that sticks together well. Before cooking rice, it must be thoroughly washed. When warm, boiled rice lends itself best to shaping. However, you should let the cooked rice cool slightly to avoid burning your hands.
Rice is traditionally used plain, but if desired, you can use the same seasonings as for sushi, such as rice vinegar, or add a mixture of Japanese spices. The mixtures are called Furikake, and they come in a variety of flavor variations such as fish, kelp, sesame seed or soy.
Origin of mochi
The history of mochi is rooted in Japanese cultural traditions and is closely related to the key role of rice as a staple food in Japan and the ritual of thanksgiving to the Shinto gods for the harvest.
In ancient times, the product was considered sacred, possessing a divine presence. Mochi was eaten to pray for health and good fortune.
Mochi is the oldest food with a history of thousands of years, originating in Japan at the end of the Jomon period (300 BC). It's no surprise that it holds a special place in the hearts of the Japanese.
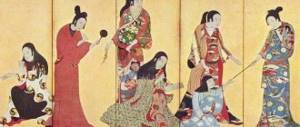
It was originally used as an offering during religious ceremonies under Heian (794-1185). In the Muromachi era (1336-1573), it already appeared on the tables of the local nobility and immediately became an important element of tea ceremonies. Indeed, thanks to its sweet taste, it harmonizes wonderfully with the bitterness of green tea.
Mochi is served as a traditional dessert at many important events, including the Japanese Matsuri festival or at the end of the year, when this small rice dumpling magically appears on the tables of local residents.
Today, mochi is eaten year-round, although it is still associated with festivals and holidays, including Japanese New Year .
Onigiri Seasonings – Japanese and International Flavors
Although simply dipping the onigiri in soy sauce makes the combination taste great, you can also stuff the small rice balls as you wish. Typical Japanese filling: fresh or dried fish. So, you can, for example, take strips of smoked salmon or tuna pate.
Fruits or vegetables, such as crispy fresh bell peppers, diced avocado, shredded broccoli, or striped cucumbers, are delicious additions. To stuff onigiri, just make a small depression in each portion of rice, place the filling there, and cover it with rice.
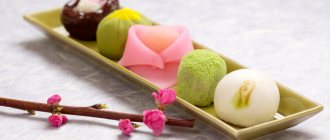
Sweet types and fillings
Sakura mochi
Sakura mochi are sweet pastries wrapped in salty sakura (cherry blossom) leaves; They are traditionally consumed on Japanese Girls' Day and during Hanami (Cherry Blossom Festival).
Chi chi dango mochi
Chi chi dango mochi – chewy, soft and sweet bite-sized rectangles with the addition of coconut milk; Outwardly they resemble Turkish delight.
Kashiwa
Kashiwa mochi is a rice cake stuffed with sweet red beans and wrapped in an oak leaf; a traditional treat in Japan on Children's Day, or Boys' Day.
Chimaki
Chimaki mochi is a sticky rice cake wrapped in a bamboo sheet to form a stick shape.
Daifuku
Daifuku mochi is a large, soft, round flatbread filled with sweet red bean paste; a classic version of a traditional Japanese treat.
Ichigo daifuku with strawberries
Ichigo daifuku is a small rice cake and a real treat, because it contains fresh strawberries.
Zenzai
Zenzai - Sweet red bean soup with pre-fried small rice balls (shiratama mochi). The Japanese are simply crazy about this homemade dessert.
Pumpkin mochi
Pumpkin mochi - heralds the arrival of autumn; made from a baked sweet mixture of boiled pumpkin and mochi rice dough; They are found both in the form of dense rectangles and in the form of round pies stuffed with the same pumpkin.
Ice cream in mochi
Vanilla ice cream with shiratama mochi and kinako, drizzled with honey.
Ohagi
Bota mochi (ohagi) is an upside-down dessert that has a mochi ball inside and a sweet red bean paste covering it.
Kusa mochi
Kusa mochi is made with the addition of yomogi (wormwood, or Chernobyl); the dessert has a green color and a leafy aroma, which is why it is often called “herbal mochi”; most often filled with red bean paste (anko).
Yatsuhashi
Yatsuhashi are triangle-shaped baked or raw mochi, invented in Kyoto, with all sorts of fillings, but most often with cinnamon.
Hanabira mochi
Hanabira mochi is similar in appearance to a flower petal (“hanabiri” in Japanese). Under the thin translucent dough you can see the pink filling made from a mixture of red beans and burdock root.
Yaki urine
Yaki mochi is placed on a wooden skewer and grilled over a fire or hot coals to allow the hard rice dough to puff up and become soft again. The name of this dish is a play on words that means "jealousy" in Japanese.
Mochi dango
Dango mochi - similar to yaki mochi, is a skewer with three small mochi balls, sometimes of different colors. They come in plain, fried, and covered in soy sauce-based caramel.
Hishi mochi
Hishi mochi (“hishi” means “diamond”) is a three-layer, diamond-shaped dessert. This edible symbol of fertility begins to be sold in the spring - in time for Girls' Day.
Anmitsu
Anmitsu - prepare agar-agar, red bean paste, fruit, mochi balls and ice cream. All this wealth is poured with sweet syrup.
In the USA, mochi ice cream with various fillings is especially popular, which is wrapped in sticky rice dough and served chilled.
Common flavor variations: vanilla, chocolate, strawberry, coffee, green tea, red wine and red beans (where would we be without them).
How to shape onigiri: rice balls, squares, triangles
Now let's move on to sculpting onigiri. This procedure must be performed with moistened hands - but do not use too much water: heavily moistened rice will quickly lose its stickiness. It is also important not to squeeze the products - otherwise the rice will begin to fall apart and it will turn out dry and tasteless.
Onigiri comes in three basic shapes: balls, triangles and squares.
✔ Rice balls are the easiest to form and stuff.
✔ Square onigiri, in turn, will help save space, fitting perfectly into a tight lunch box.
✔ Forming triangles requires the most skill, but they are the ones that most often make fun figures.
Decorating onigiri using nori sheets and other products
Ready-made onigiri can also be decorated. Nori sheets work best for this - thin sheets of seaweed can be cut with scissors like paper.
Onigiri wrapped in nori
To begin with, it’s worth, for example, decorating onigiri with thin strips, and after gaining a little skill, you can wrap them completely. In addition, nori sheets provide another advantage: those who enjoy onigiri can avoid touching the glutinous rice with their hands, and fingers will remain clean when handling onigiri wrapped in nori. By the way, nori sheets are ideal for fun decor - with creativity and imagination, using pieces of nori you can use onigiri to make soccer balls, pirates, cute faces or even Pokemon.
Like classic sushi, onigiri can be decorated with other ingredients that, at the same time, add piquancy, for example, onigiri is often rolled in black or white sesame seeds. In Japan, a popular option is onigiri mixed with fried scrambled egg flakes. It's also a good idea to roll unseasoned onigiri in a spice mixture. By the way, onigiri can also be fried in a frying pan or even on the grill - then the outer layer will be crispy.
Homemade onigiri: cooking tips
Some important tips for making perfect onigiri:
- Use freshly cooked rice . Let the cooked rice cool slightly before cooking. When you make onigiri, it should be warm.
- Wet hands . It is important to wet your hands with water to prevent the rice from sticking. To do this, place a bowl of water next to you.
- Salt your hands . Salt both hands and rub them together before you start cooking. This will help the onigiri last longer.
- Put in enough effort . When you shape the onigiri, use enough force to prevent the rice from falling apart later.
- Use a kitchen towel to preserve the onigiri for the next day . If you want to make onigiri for breakfast the next day but don't want to get up early, here's my advice. Wrap the finished onigiri (previously placed in a plastic container) with a thick kitchen towel to protect the balls from the cold in the refrigerator. Rice will freeze in the refrigerator, but this easy trick will keep your onigiri cool enough to avoid spoiling.
Like everything else, making onigiri correctly comes with practice. To make it better for you, use the step-by-step instructions and/or watch the cooking video that will be added at the end of the article.
Onigiri recipe
Ingredients for making onigiri
- round rice, 210 g (cup)
- filling
- dried nori seaweed, 6 strips 1 cm wide
- sesame seeds for sprinkling
- salt
How to cook
1. Pour the washed rice into two glasses of water in a saucepan, let it boil, then reduce the heat to low and cook for 15-20 minutes until all the water has evaporated. After this, leave the rice to cool to room temperature or lukewarm.
2. Prepare a solution of water and salt. With your hands soaked in salted water, separate the rice into balls.
3. Lightly squeezing the bun in your palm, make a depression into which you add the filling, about a level teaspoon. It is important not to squeeze the onigiri while cooking, otherwise they may fall apart.
4. Cover the hole with rice.
5. Form the resulting balls into onigiri of the desired shape - triangles, squares, ovals or balls. Wrap onigiri in strips of nori and sprinkle with sesame seeds.
Ingredients
For rice:
- 2 cups uncooked Japanese short grain rice;
- 2.5 cups of water.
For onigiri:
- kosher salt;
- 4 sheets of nori (seaweed);
- salted salmon;
- okaka;
- tuna mayo;
- 3 umeboshi (Japanese pickled plum);
- seasoned with kombu;
- sesame seeds.
For the salted salmon:
- 1 salmon fillet;
- kosher salt.
For okaka:
- 2 packs Katsuobushi (dried bonita flakes) (2 packs = 6g);
- 2 tbsp. l. soy sauce.
For the tuna mayo:
- 1 canned tuna (70 g);
- Japanese mayonnaise 2 tbsp. l.;
- half tbsp. l. soy sauce.